Screen recording a FaceTime call with sound on an iPhone sounds simple, but many users end up confused when the audio is missing.
You press record, finish the call, and later realize only the video was saved. This happens because iOS handles FaceTime audio differently than most people expect.
Apple has built-in limits to protect privacy, and those limits affect what your screen recording can capture.
In this blog post, I explain how to screen record FaceTime with sound on an iPhone in a clear and easy way.
You’ll learn what audio your iPhone can record, what it blocks, and how to set things up correctly before starting a call.
I will also cover common mistakes and simple fixes so you don’t waste time repeating recordings. By the end, you’ll know exactly what works and what doesn’t when recording FaceTime with audio.
Can You Screen Record FaceTime With Sound on iPhone?
Yes, you can screen record FaceTime with sound on iPhone, but only your own voice is recorded, not the other person’s voice.
When you use the built-in screen recording feature on an iPhone, it does not fully capture FaceTime call audio.
This is because iOS limits call audio recording to protect user privacy.
Your screen recording will save the video and any sound picked up by your microphone, such as your voice or background noise.
However, the other person’s voice on FaceTime is usually not included. Many users expect both voices to be saved, which leads to confusion when the recording plays back silently.
Knowing this limit ahead of time helps you set the right expectations and avoid recording issues later.
What Audio iPhone Actually Records During FaceTime
During a FaceTime call, the iPhone records audio very differently from what most users expect.
Screen recording does not capture the call’s internal sound. Instead, it only records audio picked up by the phone’s microphone.
This means your own voice can be saved if the microphone is turned on before recording starts.
The other person’s voice usually does not record, even though you can hear it clearly during the call.
This behavior is built into iOS and cannot be changed with settings. Speaker mode, headphones, or volume level do not change this limit.
Understanding this difference helps explain why many FaceTime screen recordings play back with little or no sound afterward.
How to Screen Record FaceTime With Sound on iPhone?
To screen record a FaceTime call with sound on an iPhone, you need to set things up the right way before the call starts. Follow these steps carefully to make sure your voice is captured in the recording.
Step 1: Enable Screen Recording in Settings
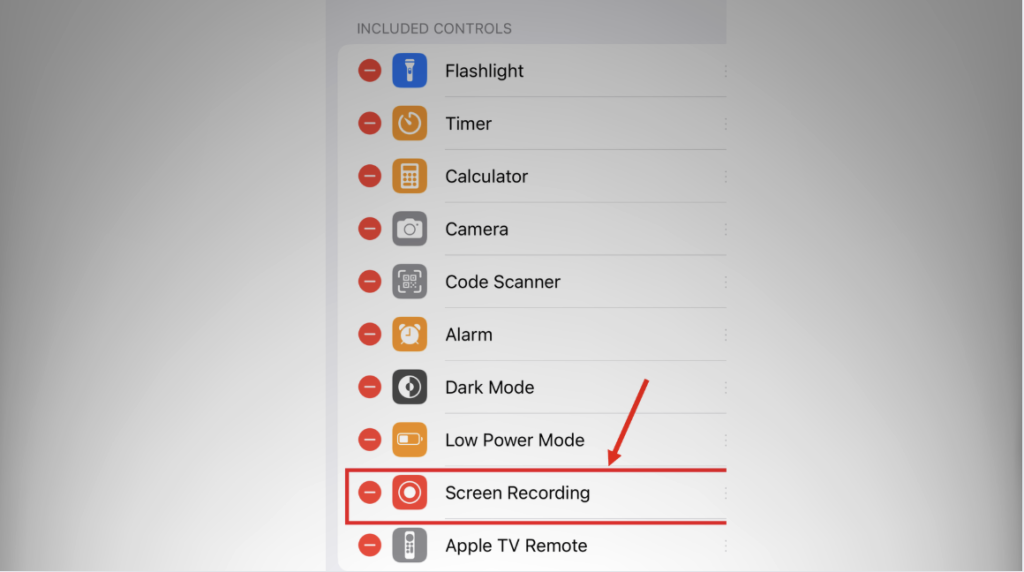
Open the Settings app on your iPhone and scroll down until you find Control Center.
Tap on it to view the list of available controls. Look for Screen Recording under the “More Controls” section. If it is not already included, tap the green plus (+) icon next to it to add it to your Control Center.
Adding Screen Recording makes it accessible at any time by swiping down from the top-right corner of the screen.
Without enabling this feature first, it will not appear in Control Center, and you won’t be able to record your screen during a FaceTime call.
Step 2: Turn On the Microphone Audio
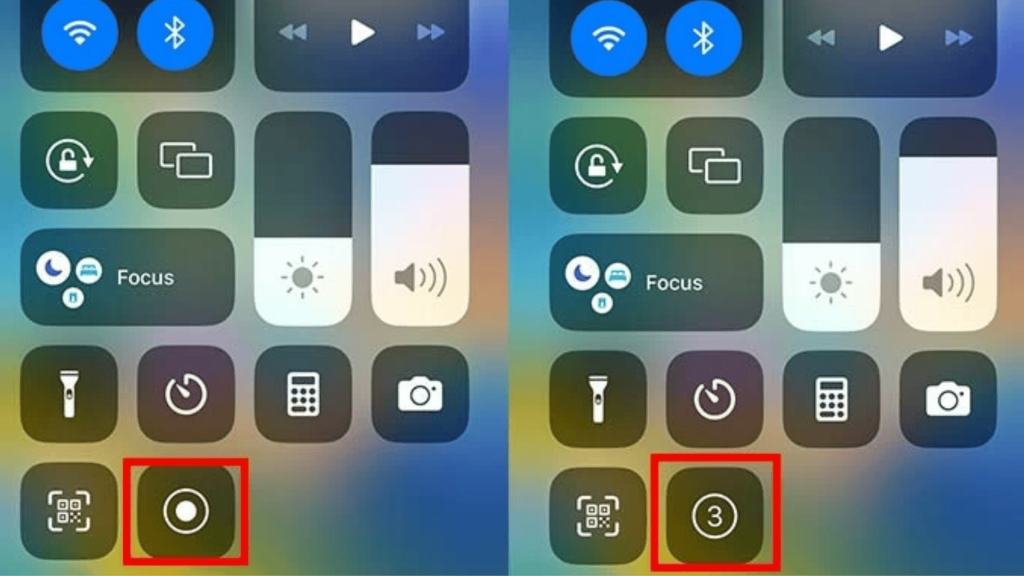
Before starting your FaceTime call, swipe down from the top-right corner of the screen to open Control Center.
Locate the Screen Recording icon and press and hold it for a few seconds instead of tapping it once. A small pop-up menu will appear on the screen.
In this menu, tap the microphone icon to turn it on.
When the microphone is enabled, it will turn red. This step is essential because iPhone screen recording captures audio through the microphone rather than directly recording FaceTime call audio.
Skipping this step may result in a video with no sound or incomplete audio.
Step 3: Start FaceTime and Begin Recording
After turning on the microphone, start or answer your FaceTime call as usual.
Once the call is connected, swipe down again to open Control Center and then tap the Screen Recording button to begin recording. You’ll see a short countdown, followed by a red status indicator at the top of the screen.
At this point, your screen activity and your voice will be recorded.
Due to iPhone audio restrictions, the other person’s voice is usually not captured. Keep this in mind if audio from both sides of the conversation is important for your recording.
Why FaceTime Screen Recordings Often Have No Sound?
FaceTime screen recordings often have no sound because of how iOS handles call audio. Apple blocks system call audio from being recorded to protect user privacy.
When you use screen recording, the iPhone only saves sound picked up by the microphone. If the microphone is off, the recording will be completely silent.
Even when it is on, only your voice is captured, not the other person’s voice. Many users assume FaceTime audio works like video or music playback, but it does not.
Using headphones, speaker mode, or raising the volume does not change this behavior.
Understanding this limit helps explain why FaceTime recordings often miss audio, even when everything seems set up correctly.
Alternative Ways to Screen Record FaceTime With Audio
Below are a few simple tips to help you get clearer screen recordings during FaceTime and avoid common audio issues before saving the final video.
- Test recording first: Start a short screen recording before the call to confirm the microphone is on, and your voice is being captured correctly.
- Use a quiet space: Background noise can overpower your voice since the microphone is the only audio source being recorded.
- Speak clearly and close to the phone: Keeping the phone nearby helps the microphone pick up your voice more clearly.
- Check microphone permissions: Make sure screen recording has access to the microphone in iPhone settings.
- Review the clip right after recording: Playing it back immediately helps catch audio issues early.
Legal and Privacy Considerations When Recording FaceTime
Recording a FaceTime call comes with legal and privacy responsibilities that many users overlook.
Even if your iPhone allows screen recording, that does not mean every recording is allowed to be shared or stored freely.
- Laws around call recording vary by country and region, and some places require consent from everyone on the call.
- Recording someone without informing them can lead to legal trouble, especially if the content is shared.
- Private calls should never be recorded for misuse, reposting, or public distribution without permission.
To stay safe, always tell the other person before recording a FaceTime call. Clear communication and consent help avoid issues and keep recordings respectful and lawful.
Tips for Better FaceTime Screen Recording Quality
These tips help improve FaceTime screen recording quality by reducing common audio and video issues, making sure your voice sounds clear, and ensuring the recording looks stable.
- Lock orientation before recording: Turning on orientation lock prevents unwanted screen rotation during the FaceTime call.
- Disable notifications temporarily: Alerts and pop-ups can interrupt the recording and appear in the final video.
- Keep Low Power Mode off: This helps prevent background restrictions that may stop or pause the screen recording.
- Use Do Not Disturb mode: This reduces call interruptions and keeps the recording clean and uninterrupted.
- End the recording manually: Stopping the recording yourself helps ensure the file saves properly without errors.
Conclusion
Screen recording FaceTime with sound on an iPhone works, but only when you understand its limits.
iOS allows screen recording with microphone audio, which means your voice can be saved if the settings are correct.
The other person’s voice usually will not record, and no setting can change that. Once you know this, it becomes easier to plan recordings without frustration.
Using the right setup, testing before important calls, and following consent rules can save time and avoid issues later.
If you need both voices, alternative methods may work better depending on your situation. Always review your recording right after saving it so problems can be fixed quickly.
If this blog post helped you, leave a comment below and share your experience or questions. Your comment may help others facing the same issue.